1. 다른 vue 컴포넌트의 함수값을 받을 때


ref를 사용할 페이지 A 받아올 페이지 B라고 하면 
A페이지에서 B의 component를 사용할 때 ref로 B의 함수 값을 받아온다
<B ref="C"></B>       // 선언할 때 ref
methods:{
 clickEvnent(){
let data = this.$refs.C.getData(); // getData()는 B페이지의 함수이다. ref값 받아 올 때는 $refs
 },
}

B페이지
methods:{
getData(){
return this.datas; //data에서 선언한 datas 를 반환해 준다.
 },
}

2. 다른 vue 컴포넌트에서 변수값을 받을 때


ref 사용할 페이지 A 받아올 페이지 B라고 하면 
A페이지에서 B의 component를 사용할 때 ref로 B의 변수 값 C를 받아온다
<B ref="C"></B>    // 선언 ref
methods:{
 clickEvnent(){
let data = this.$refs.C.Data; // Data는 B페이지의 변수이다.   받아올 때는 $refs
 },
}

B페이지
export default{
data: 'message',
...
}

'Vue' 카테고리의 다른 글

Spring Boot & Vue 연동하기 1  (0) 2023.04.25
Vue - TodoList 만들기 3  (0) 2023.03.02
Vue - TodoList 만들기 2  (0) 2023.03.02
Vue - TodoList 만들기 1  (0) 2023.02.28

springboot 셋팅

1. 구글에 spring initializr 을 검색하고 사이트로 이동한다.

2. 아래의 그림과 같이 셋팅을 해주고 generate를 클릭하면 압축 파일로 app 폴더가 생성된다.

3. 압축된 app 파일을 풀고 프로젝트를 생성해 줄 폴더에 app 파일을 넣어준다.

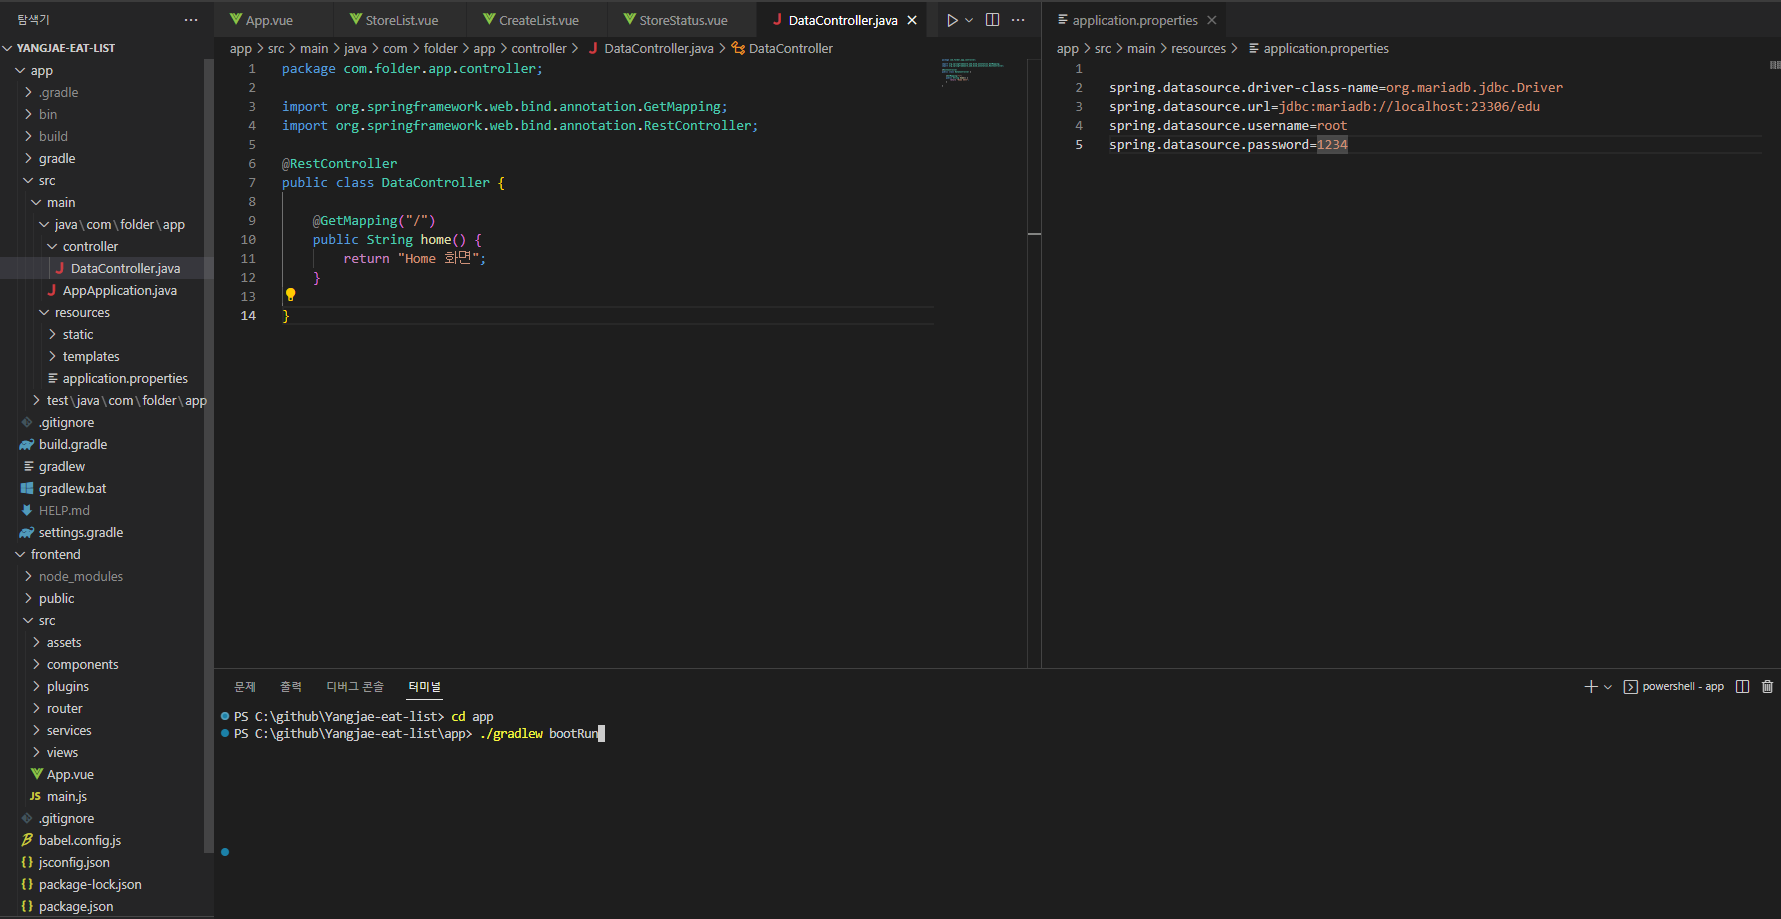
4. app/src/main/java/com/folder/app 위치에 controller폴더와 그 아래 DataController.java를 만들어주고 localhost8080에 연결 됐을 때 'Home 화면'이 출력 되도록 설정해주고 app/src/main/resources/application.properties에 그림과 같이 db 정보를 설정해주고 terminal에 app 디렉토리로 이동 후 ./gradlew bootRun을 실행하면 spring boot가 정상적으로 동작하는 모습을 확인 할 수 있다.

Vue 셋팅

1.app 상위 폴더 위치 terminal에서 vue create {projectName} 을 입력후 자신에 맞는 세팅으로 사용할 vue 버전 및 설정에 맞게 project를 생성하면된다.

2.cd frontend -> npm run serve를 하면 local:http://localhost:8081/ 으로 이동하면 처음 vue 페이지 화면을 볼수 있을 것이다.

이렇게 SpringBoot와 Vue 프로젝트 생성에 대해 해보았고

다음 글에서 axios를 통해 SpringBoot와 Vue를 연동해서 사용해 보겠다.

https://les-fourmis.tistory.com/63


Spring Boot & Vue 연동하기 2(CrossOrigin)

proxy 방식으로 Spring Boot와 Vue를 연동해 주겠다. Spring Boot: localhost:8080 // \app> ./gradlew bootRun 으로 Spring Boot 실행 Vue: localhost:8800 // \frontend> npm run serve -- --port 8800 으로 vue 프로젝트를 시작해주면 된다.

les-fourmis.tistory.com


'Vue' 카테고리의 다른 글

ref, refs 사용 방법  (0) 2023.04.28
Vue - TodoList 만들기 3  (0) 2023.03.02
Vue - TodoList 만들기 2  (0) 2023.03.02
Vue - TodoList 만들기 1  (0) 2023.02.28

1.text로 사용자에게 입력 값을 받아 기존에 만들어 둔 todoList에 Todo 추가하기

텍스트 필드 추가 event발생은 keydown으로 설정

<input type="text" v-model="newText" @keydown="addTodo">
 

e.keyCode === 13 enter키가 눌렸을 때 todoList에 newTodoObj추가

methods:{
    addTodo(e){
      if(e.keyCode === 13){
        let newTodoObj = {
          id: this.todoList.length+1,
          todo: this.newText,
          done: false,
          delete: false
        }
        this.todoList.push(newTodoObj);
        this.newText="";
      }
    }
  }

2.Done 완료한일 true, false로 체크하기

<tbody>
        <tr v-for="(todo, index) in todoList" v-bind:key="'todo_' + todo.id">
          <td>{{ todo.id }}</td>
          <td>{{ todo.todo }}</td>
          <td @click="toggleStatus(index)">{{ todo.done }}</td>
          <td><button>edit</button></td>
          <td><button>delete</button></td>
        </tr>
</tbody>
 
 
toggleStatus(index){
      if(this.todoList[index].done){
        this.todoList[index].done = false
      } else{
        this.todoList[index].done = true
      }
    }
v-for에 index로 해당 done값이 click되었을때 false면 true, true 면  false 출력
 

 3.Delete 버튼 클릭시 해당 todo 삭제

<td><button @click="deleteTodo(index)">delete</button></td>
 
deleteTodo(index){
      this.todoList.splice(index, 1);
    }

splice함수를 이용하여 원본 데이터를 index번째 열 삭제

4.Edit 버튼을 클릭하면 todo 수정 text 나타내고 enter키 입력 시 todo 수정하기

          <td v-if="todo.edit === false">{{ todo.todo }}</td>
          <td v-else><input type="text" v-model="newTextEdit" @keydown="editTodoText($event, index)"></td>
          <td @click="toggleStatus(index)">{{ todo.done }}</td>
          <td><button @click="editTodo(index)">edit</button></td>


data(){
    return{
      newText:"",
      newTextEdit:"",
 
 
editTodoText(e, index){
      if(e.keyCode === 13){
        this.todoList[index].todo = this.newTextEdit;
        this.newTextEdit="";
        this.editTodo(index);
      }
    }

5.기존 delete버튼 삭제후 todo추가시 No의 키값이 중복되는 오류

기존 addTodo 에서

id: this.todoList.length+1, -> id: this.todoList[this.todoList.length-1].id +1,

이와 같은 방식으로 변경하게 되면 this.todoList.length이 0이 되면 this.todoList[-1].id 값을 찾을 수 없어 오류가 발생

이를 해결해주기 위해 기존

if(e.keyCode === 13) -> 
addTodo(e){
      if(e.keyCode === 13 && this.todoList.length>0){
        let newTodoObj = {
          id: this.todoList[this.todoList.length-1].id +1,
          todo: this.newText,
          done: false,
          edit: false
        }
        this.todoList.push(newTodoObj);
        this.newText="";
      }
      else if(e.keyCode === 13 && this.todoList.length === 0){
        let newTodoObj = {
          id: 1,
          todo: this.newText,
          done: false,
          edit: false
        }
        this.todoList.push(newTodoObj);
        this.newText="";
      }
    },

this.todoList.length 값이 0보다 클때 와 this.todoList.length === 0 일 때로 if문을 나누어 오류를 해결

모두 Delete하고 todo를 추가해도 잘 동작하는 것을 확인할 수 있다.


'Vue' 카테고리의 다른 글

ref, refs 사용 방법  (0) 2023.04.28
Spring Boot & Vue 연동하기 1  (0) 2023.04.25
Vue - TodoList 만들기 2  (0) 2023.03.02
Vue - TodoList 만들기 1  (0) 2023.02.28

1. Visual Studio Code에서 terminal을 연 후 vue create 폴더명으로 vue 프로젝트 만들기

2.자신에 사용한 vue 버전 설치하기

3.vue프로젝트 생성 후 해당 폴더로 이동해주기 cd todolist-p2

4.npm run serve로 vue프로젝트가 실행되는지 확인하기

5.todolist-p2 하위 디렉토리 src아래 App.vue에서 todoList와 테이블 생성하기

<template>
  <div id="app">
    <table>
      <thead>
        <tr>
          <th>NO</th>
          <th>TODO</th>
          <th>DONE</th>
          <th>EDIT</th>
          <th>DELETE</th>
        </tr>
      </thead>
      <tbody>
        <tr v-for="todo in todoList" v-bind:key="'todo_' + todo.id">
          <td>{{ todo.id }}</td>
          <td>{{ todo.todo }}</td>
          <td>{{ todo.done }}</td>
          <td><button>edit</button></td>
          <td><button>delete</button></td>
        </tr>
      </tbody>
    </table>
  </div>
</template>
export default {
  name: 'App',
  data(){
    return{
      todoList:[
        {
          id: 1,
          todo: 'vue',
          done: false,
          delete: false
        },
        {
          id: 2,
          todo: 'react',
          done: false,
          delete: false
        },
        {
          id: 3,
          todo: 'angular',
          done: false,
          delete: false
        },
      ]
    }
  }
}

6. 간단한 CSS입혀주기

<style>
#app {
  font-family: Avenir, Helvetica, Arial, sans-serif;
  -webkit-font-smoothing: antialiased;
  -moz-osx-font-smoothing: grayscale;
  text-align: center;
  color: #2c3e50;
  margin-top: 60px;
}

table thead tr th{
  height:30px;
  background-color: black;
  color:white;
}

table tbody tr td{
  height:30px;
}

table tbody tr:nth-child(odd){
  background-color: #cccccc;
}

</style>


'Vue' 카테고리의 다른 글

ref, refs 사용 방법  (0) 2023.04.28
Spring Boot & Vue 연동하기 1  (0) 2023.04.25
Vue - TodoList 만들기 3  (0) 2023.03.02
Vue - TodoList 만들기 1  (0) 2023.02.28


TodoList 만들기 기능 설명

Table : 테이블 읽어오기    // Read

Text : TodoList 추가   // Create

Done : ture(완료), false(미완료)로 체크   // Update

Edit : Todo 내용 수정   // Update

Delete : 해당 No TodoList 삭제  // Delete

참조사이트

https://www.youtube.com/watch?v=o5-jdNyEuX0 


'Vue' 카테고리의 다른 글

ref, refs 사용 방법  (0) 2023.04.28
Spring Boot & Vue 연동하기 1  (0) 2023.04.25
Vue - TodoList 만들기 3  (0) 2023.03.02
Vue - TodoList 만들기 2  (0) 2023.03.02

+ Recent posts